Sending a Message
Create a message to send to all or selected registered recipients of a comm type.
To send a message:
- Click
 Customer Comms to open the Customer Comms module.
 - Select a comm type for the message. See Comm Types Module for more information about comm types.
- Click
 Add to create a new message and enter the following details:
Field Description Delivery Method Choose the delivery methods for the message. Customers who have registered for the message type will receive the message via their chosen delivery method.
To deliver the message as an announcement on the web portal, choose the "Publish to Portal" delivery method.
Expiry date Set an expiry date, or accept the default date.
For the "Publish to Portal" delivery method, this determines for how long the message is displayed.
Text
Enter the message text. The message may have a default text which you can use or not as you choose.
There is a default limit of 160 characters for SMS messages, but you can change this limit by setting the Customer Comms text limit for SMS parameter. An error message is displayed if you exceed the limit.
Document
Click Attach to attach a PDF document.
- For fax messages, only the pdf document will be sent unless there is no attachment, in which case the text is sent
- For email messages, both text and attachment are sent
- For SMS messages, only the text is sent.
- Click the button beside the Recipients field to open the recipient selection window, and enter the following details:
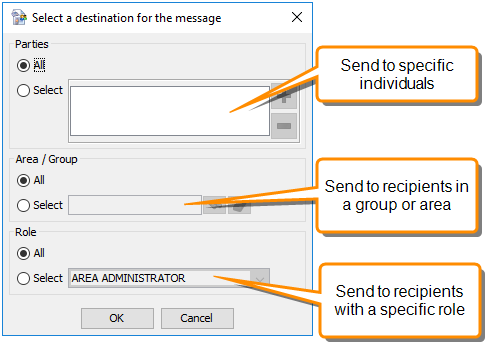
Field Description Parties
Choose one of these options:
- All - send the message to all registered parties. If you choose this option you can filter the recipients further by area/group and role.
- Select - choose the recipients explicitly. Use the Add button to search for and find parties.
Note that you must choose recipients who are registered to receive this message type. Otherwise you will see an error message when you try to save the recipient list.
Area/Group
These options are available if you choose all parties. The options are:
- All - don't filter by area or group
- Select - click
 Find to select an area or group. Only registered recipients with authorities that apply within this area or group (such as owners of properties in the area) will receive the message
Role
These options are available if you choose all parties. The options are:
- All - don't filter by role
- Select - select a role from the drop-down box. Only registered recipients with this role will receive the message. For example, send a message to recipients with an INVOICE CONTACT role.
- Click Send to send the message. The message is sent immediately unless there is a blackout for the selected comm type, in which case it will be sent when the blackout ends. See Restricting Communications by Time for more details.
Sending to alternate phone numbers
If a recipient is registered to receive SMS messages, the message can be sent to an alternate number if it is not successfully sent to their mobile number (or if they do not have a registered mobile number).
To configure sending to alternate numbers:
- Ensure that the recipient has all the necessary numbers entered on their Party record.
- Set the System > Customer Communications Distribution Scheme parameter. This can take the following values:
Property Description Send once only
Send to one number only. If a Mobile No is set for the party, the message will be sent only to that number. Otherwise the message will be sent to the Alt Phone Number if it is set.
Send to all known numbers
Send the message first to the Mobile No and then to the Alt Phone Number if the message to the mobile number is not sent successfully.
Use mobile phone number
Send only to the recipient's Mobile No. If no mobile number has been entered for the party, no message is sent.