Creating an Area
You can create areas in the Network Editor, or in the Areas module. See Creating an Area for details of using the Areas module to create areas.
Network Editor or Areas Module?
It is easy to create areas in the Network Editor, because you can pick the area boundaries visually. However, you will often create areas in the Areas module because it provides more control. If you want to make changes to an existing area, you must use the Areas module.
To create an area using the Network Editor:
- In the Network Editor choose Edit > Create Area from the main menu. A dialog box pops up to show you what nodes you have selected as area boundaries.
- Enter a name for the Area. This is required.
- Click on a node to choose a boundary. See the selection tips below.
- Click OK to save your changes.
The Network Editor will generate the area and display a message to confirm that the area was created successfully.
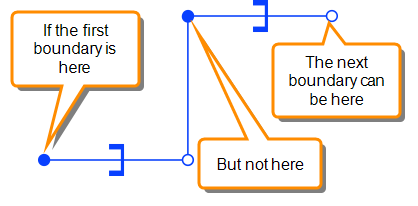
Boundary selection tips:
- You must specify at least one up boundary node. The area will extend from this node, downstream to the next boundary or to the end of the network.
- Pick boundary nodes that belong to regulators.
- When you choose a boundary regulator node, make sure that the all the boundary regulator objects will be included in the area, as shown here: