Linking Orders
An important use of the manual planning process is to smooth the flow changes during the plan day. The advantages of this are:
- To even out the flow rate during the plan day and avoid demand spikes.
- To reduce the number of manual flow changes required at the regulators and reduce the workload of the field operators
- To keep the flow through the regulators within capacity.
When you plan the orders in a pool, you arrange them in a sequence that smoothly shares out the water entering the pool throughout the plan day and allows you to plan a steady flow rate from the supplying regulators. You create links between the start and end of adjacent orders to store the order sequence.
It is possible to make the same order changes without linking, but the advantage of linking is that changes can be automatically cascaded to linked orders so that you can easily preserve the sequential relationship between orders.
Layout of the Link Tool
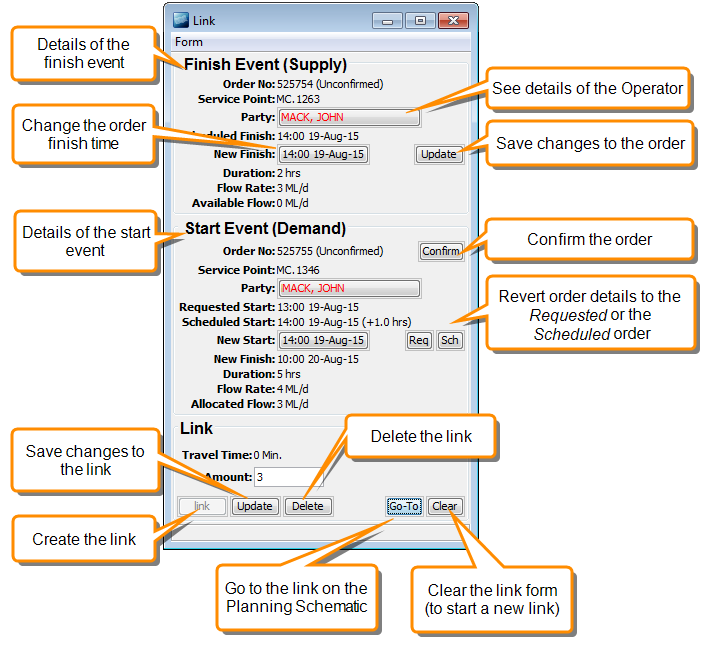
Order links are created using the Link tool. To open this, choose Event > Link from the Planning Schematic menu. When the tool is open, click on a flow event to add it to the form.

To link flow items:
Note
It can be helpful to open the flow histograms for important regulators and leave them open while you create your links. For example, view the supply regulator for the current spur and any critical upstream regulators.
This will allow you to see the effects of the links on the flow through the channel.
- On the Planning Schematic main menu, choose Event > Link to open the link tool.
- On the schematic, click on one of the events that you want to link.
- Then click on the other event. You can only link the start event of an order to the finish event of another order. The details of both events will be displayed on the link tool.
- If you make any changes to the event times, click the Update button to save the changes. By default, the link tool will suggest that you move the start event so that it is synchronised with the finish event. You do not have to accept this option, you can set the two times to whatever you choose.
- Click Link to create the link. The link is displayed as a dashed line on the Planning Schematic. You can now clear the link form and create more links.
Changing Links
You can change the timing of links, or delete links after you have created them.
Cascading the finish time
If you change the time of a finish event, you can automatically cascade the change to the following linked start events. For example, if you finish later you can start the next events later. You are prompted to choose whether to do this when you update the change.
To change a link:
- On the Planning Schematic, click on the link that you want to change. The flow item details open in the Link tool.
- You can make the following changes:
- Change a start or finish time by clicking on the time and entering the new time. Click Update to update the order. If you change the time of the finish event you are prompted to choose whether to cascade the change to the start event.
- Revert the details of the start event to the original requested details. Click Req to load the requested details or click Sch to reload the scheduled details.
- Click Delete to remove the link.