Creating an Outlet
About Outlets
An outlet is an end point in a water network where water flows out of the network to supply consumers. Outlets are physically connected to a reach. Depending on your configuration, you may have several subtypes of outlet, both metered and unmetered.
As well as being connected to the water flow network, outlets have relationships with the property or properties to which they supply water. These relationships are called authorisations.
Placing an outlet
| Note: | Recommendations: We recommend that you follow these guidelines when placing an outlet:
|
|---|
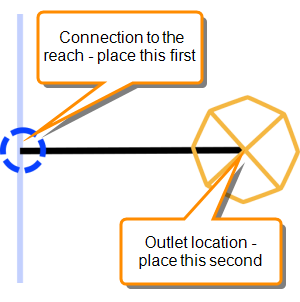
To place an outlet on the network schematic:
- In the Network Editor, select the type of outlet to add from the objects palette.
- Click on the reach where you want the outlet to connect to the reach. This places the network node.
- Click on the canvas where you want to place the outlet icon.
You can now connect the outlet to any associated properties.
Setting the Minimum and Maximum Flow for an Outlet
Set the minimum and maximum flow rates for an outlet to constrain the orders that can be placed at the outlet.
To specify flow limits:
- Select the side gate in the Network Editor .
- Right-click and choose Details from the shortcut menu.
- In the Object Details > Attributes tab, select the Min Flow or the Max Flow attribute.
- Click Modify and enter the flow in ML per day.
- Click Save to save your changes.
Help for SPM, version 3.4. Topic updated: 30 May 2018. Help published: 14 June 2019